Recruitment
The current document describes the stages of recruitment and the various evaluation points that occur during the process.
Launch of a recruitment round
- The epic planning managers are responsible for determining when the availability needs of their cells will require launching a recruitment round. They communicate this need as much as possible in advance to the recruitment manager and the CEO - ideally at least 1 month before the availability is required, to provide enough time to complete the round.
- Recruitment managers should familiarize themselves with criteria that we use for making decisions about recruitment. They are documented here.
- The CEO publishes the job ad, which direct candidates to submit the recruitment form.
- The CEO informs the team's recruitment manager of the upcoming start of a recruitment round, and creates a workflow board to track the progression of the round's process.
- The recruitment manager includes a ticket in their upcoming sprint for it, and mentions in the comments of the workflow board how many newcomers they are looking for.
- The candidatures are available to the recruitment manager immediately upon submission, without filtering. The recruitment manager assigns the unassigned candidatures to themselves, starting with the oldest submissions.
- This self-assignment operation can be repeated up to every two days by the recruitment manager (which might be necessary if recruitment needs are high and/or candidatures are being reviewed quickly).
Preparing a list of Trial Projects
- Before starting the pre-selection and asking candidates for interviews the recruitment manager should ensure there is a sufficient number of trial projects for the candidates.
- Creating trial projects that will allow us to evaluate effectively might be tricky to do in our regular projects where requirements might be constantly moving. The following avenues can be used to pick up tasks that are not dependent on client requirements and timeline:
- Create tickets for Core contributors to come up with tickets that can satisfy trial project requirements
- Look through open byte sized tasks & bugs list
- Check the core contributors meeting updates forum every two weeks and look for potential "help wanted" tasks
- Reach out to other teams like Axim (previously tCRIL)
- As a last resort, use pending tickets from internal projects like Listaflow or Sprintcraft
Creating tickets for Core Contributors for Trial Projects
If no existing suitable tasks for a trial project exist upstream, the recruitment manager can obtain new ones from OpenCraft's core contributors:
- Assuming the candidate starts their trial project in the sprint X+1, the recruitment manager creates a ticket for the sprint X, with the label
CoreContributorand ensures it is assigned to a team member in the Core Contributor program. - The Core Contributor creates one or more tickets, with the label
trial-project, suitable for a trial project. - The recruitment manager assigns the task to the candidate(s) for Sprint X+1 and finds a reviewer for the task.
- If the Core Contributor has created any extra/unused tickets, they are either retained for future trial projects if they aren’t time sensitive. If they are time sensitive, then the
trial-projectlabel is removed and worked on by the team as a regular ticket.
Pre-selection of candidates for interviews
The recruitment manager does a pre-selection of candidatures to invite for an interview. It is a very basic filter over the candidatures - we don't want to be too selective at this stage, as it can still be quite hard to tell whether a candidate would be a good fit just from that information. So there are few criteria, but they are strict - if a candidate fails to pass any of these, they are eliminated:
Contribution to third party projects
We want to see at least one contribution (PR/patch) to a third party project, which isn't completely trivial (a small bug fix is fine, but just fixing a typo, spacing or a missing import isn't enough, you want to be able to have something to evaluate), and which has been merged by the third party project.
No exceptions on this, it's a hard rule. This is the main filter of the pre-selection. So we check this first, and generally someone saying explicitly that they don't have contributions is enough to rule them out -- in these cases we save time by not having to look at the rest of the candidature.
Precisions:
- The type of work/tech from the contributions don't need to be related to our work.
- The recipient project can be small, but should be something that has users (see its number of stars & forks - there should be at least 10-20 of each).
- PRs done as part of an employment are ok (that's also what we do!), but it should really be done openly, and still preferably to a third party. If the PRs are all silently merged, it means there was either no review, or it happened privately, and this doesn't really qualify as an open source contribution
- There should also be at least a PR description, and some comments/discussions with upstream - we are looking for people who communicate.
- We are trying to filter for people who care about contributing to someone else's project, so merely releasing code on their github, or even contributions to a project they are a maintainer of, doesn't count.
- Since often candidates just point at their github account, we get all their third-party PRs by visiting this URL (we check this for both the github & gitlab accounts when they are provided):
- Github: https://github.com/pulls?q=is%3Apr+author%3Aviadanna+-org%3Aviadanna
- Gitlab: https://gitlab.com/dashboard/merge_requests/?scope=all&state=all&author_username=antoviaque
Proper writing skills
Candidates don't need to have flawless spelling & grammar, but it needs to be reasonable. We think about whether the type of writting would work with a client for example. We aren't too harsh though - it can be hard to tell at times, and we can give the benefit of the doubt.
Python, Django & React
We require experience in at least Python & Django, plus preferably React. Sometimes it's unclear - some candidates don't specify some of their experience... So we wouldn't necessarily eliminate a promising candidate who doesn't list one of those (and React is not mandatory either, just very appreciated), but we will take a note of any doubt on these, to ask during the interview.
Although if there is no mention or sign of any practice of Python, the candidate almost certainly has no Python experience, so we reject the candidature in these cases. Some candidates omit mentioning Django when they have only a small amount of experience with it, and it's still fine in that case after verification, but nobody fluent in a language omits mentioning it in their list of skills, especially when other languages are mentioned.
Seniority
We also currently don't hire junior developers - from past experiences, the remote environment combined to the expected quality and efficiency doesn't work well with junior profiles, at least with our current organization. We might revisit this in the future, but we would need to put in place a specific process to allow them to acquire the required skills and experience.
At the moment, we require at least 2-3 years of professional experience as a hired developer. We sometimes make an exception for a prolific open source contributor who has demonstrated great technical and social skills in his contributions, and thus already shows a senior profile.
Also, we accept candidates who have been recently been employed by another Open edX provider, but we check for exclusivity clauses in their contract before proceeding with an interview (to be discussed with the CEO when someone from another provider applies).
Fields to fill
In the spreadsheet containing the candidatures, besides the answers submitted by candidates, the recruitment manager will see a few additional columns to fill:
-
Status: The current status of the candidature (drop-down).
-
Python, Django, React: This is a reminder to write in the cell any of those skills for which the candidate isn't clearly experimented And then, during the interview, we ask the candidate about it. Sample value: "Django? React?" => which would be completed with the answer during the interview. For candidates which have all three pre-requirements, we put "OK" in this column - this helps ensuring that we remembered to check (or to ask).
-
Comments: Meant to contain the explanation for the recruitment manager's decision.
-
The other fields are for the interview itself - see below.
Scheduling interviews
Emailing selected candidates
The recruitment manager sends an email to each candidate that they selected. We use a standard email template for the content of that email. Make sure to CC the recruitment@ mailing-list in your exchanges with candidates, to allow others to follow.
Scheduling through Calendly
We use Calendly to schedule interviews. Get an account from the administration specialist if you don't already have one, and setup a dedicated event for interviews:
- Open for the week following the pre-selection
- At times which allow a reasonable coverage of most timezones (the afternoon UTC time is usually good for that)
- Make sure to keep the times narrow, to allow to batch the interviews - it's best for focus to not end up having them spread all over your days
- Enable Calendar invitations, to automatically send Google Calendar invites
- Link it to the OpenCraft Zoom account (to allow to host longer meetings), and enable the automated inclusion of a Zoom URL in the meeting invite
Ensure scheduled meetings have recording enabled with gallery view
We need to record interviews to allow for later review by other team members. To ensure we don't forget to start the recording during the meeting, we enable the option ahead of time, in the scheduled meeting details. The setting for each individual scheduled meeting should look like this:
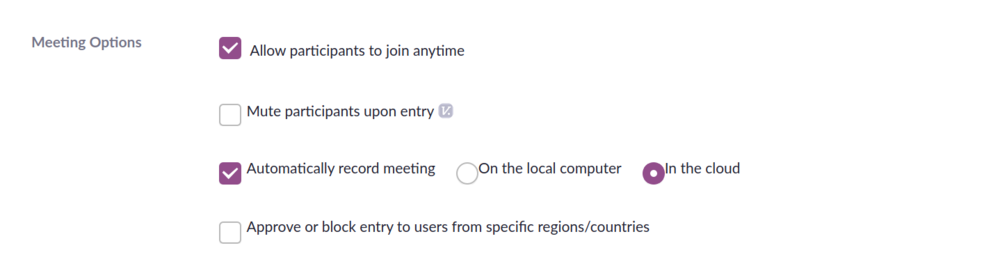
Recording in the cloud offer the best/most reliable way to ensure the meeting will have been recorded.
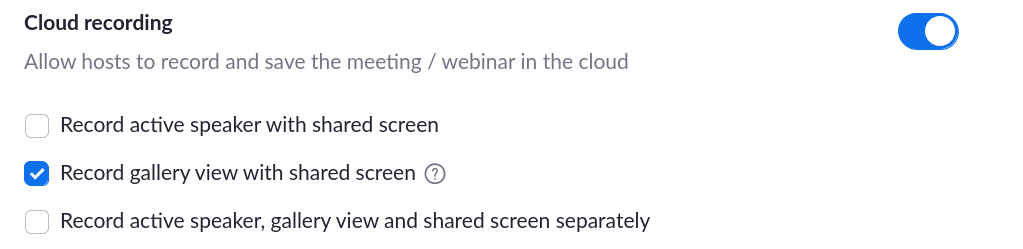
To be able to keep the candidate's reactions visible in the recording, even when they are not talking, make sure to select "Record gallery view with shared screen" in your account settings:
Interviews
Script
The interviews lasts 30 minutes, and we use a script1. The script is private, to not demesurably advantage candidates who read the handbook ahead of the interview.
We don't necessarily say exactly and only the content of the script (we are not a call center ;p), but we try to stick to it, as the more similar it is across interviews, the better we are able to compare them with each other. This is especially true of the code exercise, where the way to explain it can influence significantly what the candidate will understand and how they will approach it.
Grading
During the interview, we progressively grade the candidate in the corresponding columns of the spreadsheet, with a short comment on each. The rating is 1 to 5, with 5 being the highest. E.g. "5 - aced the exercise!".
Video recording upload
We then upload the video recording of the interview to our private file drive, using the 'Gallery view' file. Also add a link in the candidate's spreadsheet entry, in the dedicated column. This will allow other team members to review it.
Trial Project
- The recruitment manager takes a decision on whether the candidate has passed the interview and notifies the Admin Specialist to schedule the second interview.
- The recruitment manager sends a rejection email to the candidates who have been refused.
- The Admin Specialist reviews the profile. If an application is accepted following the technical interview, the Admin Specialist meets with the candidate for a second interview, to take a decision and to discuss contracting terms. These additional steps can be viewed in the Administrative onboarding section below.
Assigning Trial Project
Once the Admin Specialist completes the administrative onboarding necessary for a candidate to participate in the Trial Project, they notify the Recruitment Manager.
- The recruitment manager provides access to internal tools - JIRA for ticket tracking and Mattermost for any ad-hoc communications - using the candidates personal email ID. While primary communication might happen outside the internal JIRA, for example on an upstream GitHub issue, the JIRA ticket still provides the necessary access for the candidate to track their time.
- A trial project can start on any day of the sprint. The recruitment manager sends an email with all the relevant details of the trial project to the candidate based on their indicated availability. The recruitment manager must ensure the candidate's contract is signed and in place before sharing the details of the project.
Trial Project Review
- As a part of the trial project candidate onboarding, the recruitment manager schedules a Trial Project Review task for all the members of the cell and the CEO, in the following sprint.
- If the candidate completes the trial project before the second Thursday of the sprint, the cell members complete their review before the end of the sprint.
- If the candidate completes the project in the last 2 working days of the sprint or doesn't complete the project within the sprint, the review task is moved to blocker and completed by the team in the first week of the next sprint.
Either way, the results of the trial project are communicated to the candidate before the end of first week of the following sprint. This allows the candidates who are available immediately to start onboarding without delay.
Evaluation Criteria
- Technical Skills.
The candidate must be able to handle the complexity of the task comfortably. -
Time management and spillovers.
The trial project must be completed within the time budget of 20 hours (excluding reviews) and without it becoming a spillover, or within 14 days from the date of assignment if they started in the middle of a sprint.When is a trial project considered as "completed"?
For the purpose of trial project's evalutation, a trial project is considered "completed" when the internal review of the ticket is over and no further changes are expected. This is different from the JIRA ticket which is considered completed only when the changes are merged into the target repository and/or deployed.
At this stage, an upstream review might be pending, underway or completed. While completing the upstream review within the 14 days and having the changes merged is viewed favorably, candidates are not penalized for upstream reviews delays.
-
Communication.
See Response Times and Comunication Expectations for the expected response times and the "Communication" point under Developer Review for more details. - Adaptability.
The candidate should respond gracefully to changes in task requirements and scope, the PR reviews and comments, communicate concerns and issues.
Review Guidelines
The trial project reviews should
- Follow the general structure as the one below, skipping sections only when there is nothing to note.
 1
 2
 3
 4
 5
 6
 7
 8
 9
10
11
12
13
14
15
16
17
18
19
20
21
22
23
24
25
26
27
28
29
## Positives Technical Skills * ... Time Management * ... Communication * ... Adaptability * ... ## Improvements Technical Skills * ... Time Management * ... Communication * ... Adaptability * ... **Verdict:** Yes/No - Have the verdict as a clear Yes or No without any ambiguity or riders. When there is a red flag or a doubt, it should be a No.
- Include links to relevant content like JIRA or GitHub comments. These are important to see what the reviewer is trying to communicate and also useful when sharing feedback with the candidate.
- Adhere to the deadline mentioned in the ticket when submitting the review, as they are usually in the middle of the sprint, unlike other tickets which are usually worked on until the end of the sprint.
Timeline of Trial Project
| Date | Description |
|---|---|
| Day -15 or earlier | Trial projects are identified and created. |
| Day -14 to -1 | Start of the recruitment cycle. Applications reviewed, interview scheduled and conducted. |
| Day 0 | Candidates signs the contract and indicates availability for the trial project. |
| Day 1 | Recruitment manager performs the trial project onboarding and assigns them with a ticket. Candidate starts to working on the ticket. |
| Day 2 to 14 | Candidate completes the Trial Project. For candidates starting in the middle of the sprint, the deadline will be end of the next sprint which can be longer than 14 days. |
| Day 15 or 16 | If they complete the trial projects at least 2 working days before the end of the sprint, the trial project review is completed and results shared with the candidate. |
| Day 18 or 19 | If the candidate completes their trial project in the last 2 days of the sprint, reviews are completed and results shared on the first Friday of the following sprint. |
Administrative onboarding
Second interview & contract
The process of hiring a newcomer is shared between the Recruitment Manager and the Admin Specialist. This section details the steps to follow once a candidate has passed their first (technical) interview.
Candidate selection and preparing for 2nd interview (Recruitment Manager)
Once a candidate has passed their first (technical) interview with the Recruitment Manager, the Recruitment Manager pings the Admin Specialist to set up a 2nd interview. The Admin reviews the candidate profile from the applications spreadsheet. No need to do any specific review, since the Recruitment Manager already confirmed that the profile would match -- though of course, like everyone involved, the Admin has a right to refuse a candidate at any time (1 "no" is enough to disqualify a candidate).
2nd interview invitation (Admin)
Schedule an interview with the candidate, using the following template:
```Hi FIRSTNAME,
My name is Gabriel, and I am an Administration Specialist at OpenCraft. I hope this email finds you well. I wanted to follow up after your technical interview with RECRUITMENT-MANAGER and congratulate you on passing! You have now advanced to the final round of our hiring process.
I would like to schedule a call with you to discuss the personal, cultural, and contractual aspects of working at OpenCraft. During the call, we will cover the following points:
- Learning more about you - your background and interests, especially your relationship to open source.
- Addressing any questions you may have about our way of working to ensure that we are a good fit for you. Please review our handbook at https://handbook.opencraft.com/ before our meeting and write down any questions you may have so we can discuss them.
- Discussing contract terms. I have attached our contract template, which I kindly ask you to review thoroughly. During the meeting, we will also confirm your hourly rate (in Euros). As remuneration is based on actual time spent working and not a fixed weekly or monthly amount, please factor in all costs, including taxes, vacation, and benefits when making your calculations. Your rate will allow us to make a final decision on your hiring. Please make sure that it's going to be your final rate, since you won't be able to change it later on in the process. We won't try to negotiate: we prefer to work with you at the rate you want, and not any lower. After the call, we will check and confirm if it is within our budget. You can see how we handle remuneration in our handbook at https://handbook.opencraft.com/en/latest/team_compensation/.
We understand that you may not know how to best price yourself, so we have built a tool to help you determine your rate. Please make a copy of this spreadsheet (https://docs.google.com/spreadsheets/d/1XI47TfbWo623ZKT-XfChKu-lX6QlxbcdH0xgTIkRqdY/) and fill it out as completely and thoroughly as you can. We will not ask you for the spreadsheet or its results, but given what you enter, it will suggest a rate for you.
To schedule the call, please use this CALENDLY-LINK . If you have any questions in the meantime, don't hesitate to reach out. I look forward to our call! ```
2nd interview call (Admin)
Conduct an interview with the candidate.
- Check if:
- They show a real interest for open source, as well as an history of contributing by collaborating with others
- They have any pending questions about how OpenCraft works, or about their contract -- answer them, and verify that they don't have a significant blocker or incompatibility
- Their hourly rate is within the acceptable range (don't react about it during the meeting though, to avoid negotiations)
- Confirm:
- Their starting date: the first day of the next sprint the newcomer is available - try to keep the delay as short as possible, including asking to negotiate the notice period with their employer, if it is long
- Their weekly volume of hours
- That they can send an invoice manually for the trial project (not handled through the Billing app).
- That they understand that compensation is conditional to delivering actual work (i.e. if someone spends 10h just reading doc and not delivering any usable code, we won't pay them).
- That any outstanding question or gap in the application details spreadsheet for this candidate have been resolved & added to the spreadsheet notes
If all is good, then move on to contract signature.
Contract signature (Admin)
Send the following email:
Hi FIRSTNAME,
I'm glad to have met you (/TIME)! And congratulations -- we're accepting your application, and we think you will make a great addition to the team : )
To finalize the contractual part, we will send you a contract through Docusign. Please review the contract thoroughly. If everything looks good, fill the information fields and sign. We'll return an executed copy, and we'll send you more details for the start of your trial project. We will also require you to send a few legal documents as part of your onboarding.
Please let me know if you have questions about any of this.
Hoping to see you on the team soon!
Then:
- Log into DocuSign
- Go to
Templatesin the top menu - Next to the "Framework contract" template, select
Use - From the template overview page, edit the recipients as needed. In most cases, the set order should be -> Admin (to add contract terms) -> Contractor (info & signature) -> CEO (signature). Make sure you add the correct names and email addresses.
- Important note: If Xavier is on vacation for more than a week, use billing@opencraft.com instead of Xavier's email, and sign the contract for him. Otherwise you won't be able to sign the contract since you don't have access to Xavier's inbox, and the newcomer could be left without an executed version of the contract for a long time.
- Scroll down and edit the email subject line to include the Contractor's full name
- Hit
Sendin the bottom right corner to start the process.
First, the Admin Specialist will receive the contract. This is where we must add the contract terms, specifically:
- The weekly hours commitment
- The hourly rate
- The newcomer's start date
Once completed, the contract will be sent to the newcomer for signature. After that, the CEO will be asked to sign.
At this point, the Admin Specialist schedules a MNG ticket for the CEO to sign the contract (or add this signature to an existing task, if more than one signature is required, to process things in batch). This might incur a delay in the execution process, but we can start onboarding the newcomer as soon as they have signed their copy.
Once the newcomer has signed their copy, send them the following email, and add the Recruitment Manager and recruitment@opencraft.com in CC so they can take over:
Hi FIRSTNAME,
Thanks for signing the contract! We will return an executed copy shortly, if not done already.
I'm looping RECRUITMENT-MANAGER back in, who will send you more details before your start date on START DATE.
Welcome to the team, and please don't hesitate if you have any questions!
Onboarding kickoff (Admin Specialist)
Once the contract signature email (above) has been sent, the Admin Specialist starts the newcomer onboarding process -- this should ideally be done ahead of the Thursday before the beginning of the sprint where the newcomer starts, to give time to the different roles involved to complete the onboarding and create the initial tasks.
- Go to the onboarding checklists directory on the Drive
- Create a copy of the template found in the folder, and rename it after the newcomer's name.
- Complete the tasks assigned to the "Admin Specialist" in the checklist.
Rejection email (Admin)
If for some reason the candidate doesn't work out, here is a rejection template:
Hi FIRSTNAME,
Thank you again for meeting with me - it was a pleasure to talk to you.
I have just finished reviewing the candidatures, and wanted to let you know that we will unfortunately not be retaining your application. Please do not take it personally - we received a lot of strong profiles, and we do sometimes make mistakes.
In any case, I wish you good luck in your job search, and I hope you end up finding a position that you like!
Generally only provide more feedback if the candidate asks for it — it keeps the discussions simpler in most cases.
-
Private for OpenCraft Employees ↩